
Education/Access & anatomy
Finding and negotiating MB2
Interactive anatomy
Explore the upper first molar in 3D
Three danger points—and why MicroPath matters
Scroll to read all three danger points ↕Danger point one: the first bend
Finding MB2 is only the beginning. Beyond the pulp chamber, the canal may curve abruptly. A hand file can enter, then stop, but resistance does not always mean the canal is blocked.
A stiff stainless-steel file may press into the dentine instead of following the curve. Forcing it risks creating a ledge that makes further negotiation difficult. Moving from size ten to size fifteen increases tip diameter by fifty percent and reduces flexibility.
Use small, appropriately pre-curved hand files for exploration. Respect the length they can negotiate without force, and reassess if progress stops.
The seventeen-millimetre MicroPath MB2 file is designed for this first danger point. Its nickel-titanium Flex-Ion construction provides flexibility for abrupt curves within the first three to five millimetres. Its short format creates handpiece headroom, while the size fifteen tip and point-zero-five taper provide an initial preparation step. The aim is controlled entry along the anatomy without creating a ledge.
Danger point two: the deeper curve
Passing the first bend does not mean the canal is straight. Deeper in the root, it may change direction again where the mesio-buccal one and mesio-buccal two canals meet. A hand file may pass the first curve but meet resistance here. Continued pressure can create a second ledge, sometimes obscured on a bite-wing radiograph.
MicroPath size thirteen and fifteen glide-path files are designed for this deeper pathway. Both have a point-zero-three taper. Size thirteen provides an intermediate step between ten and fifteen; size fifteen develops the glide path further when anatomy permits. Their smaller taper limits the increase in diameter along the working portion.
This creates a controlled transition to a reproducible glide path before larger shaping files are introduced. These files support careful exploration; they do not replace it. Let anatomy and tactile feedback guide each step.
Danger point three: instrument stress
At a deeper curve, a rotating instrument undergoes repeated tension and compression. Cyclic fatigue may cause separation, leaving a fragment toward the apex. Binding can also create torsional overload.
MicroPath establishes the glide path before larger shaping files encounter this anatomy. The short MB2 file manages initial access, followed by a size thirteen or fifteen glide-path file as appropriate. Each instrument has a defined role, rather than forcing one file through every stage. Flex-Ion technology is designed to add safety in this demanding zone.
A University of Pennsylvania study by Iqbal, Kohli and Kim recorded eighty-one separated instruments in four thousand eight hundred and sixty-five endodontic cases. Almost eighty-three percent occurred in the apical third.
MicroPath supports a safer sequence: establish entry, develop a confirmed glide path, then shape while respecting the curvature.
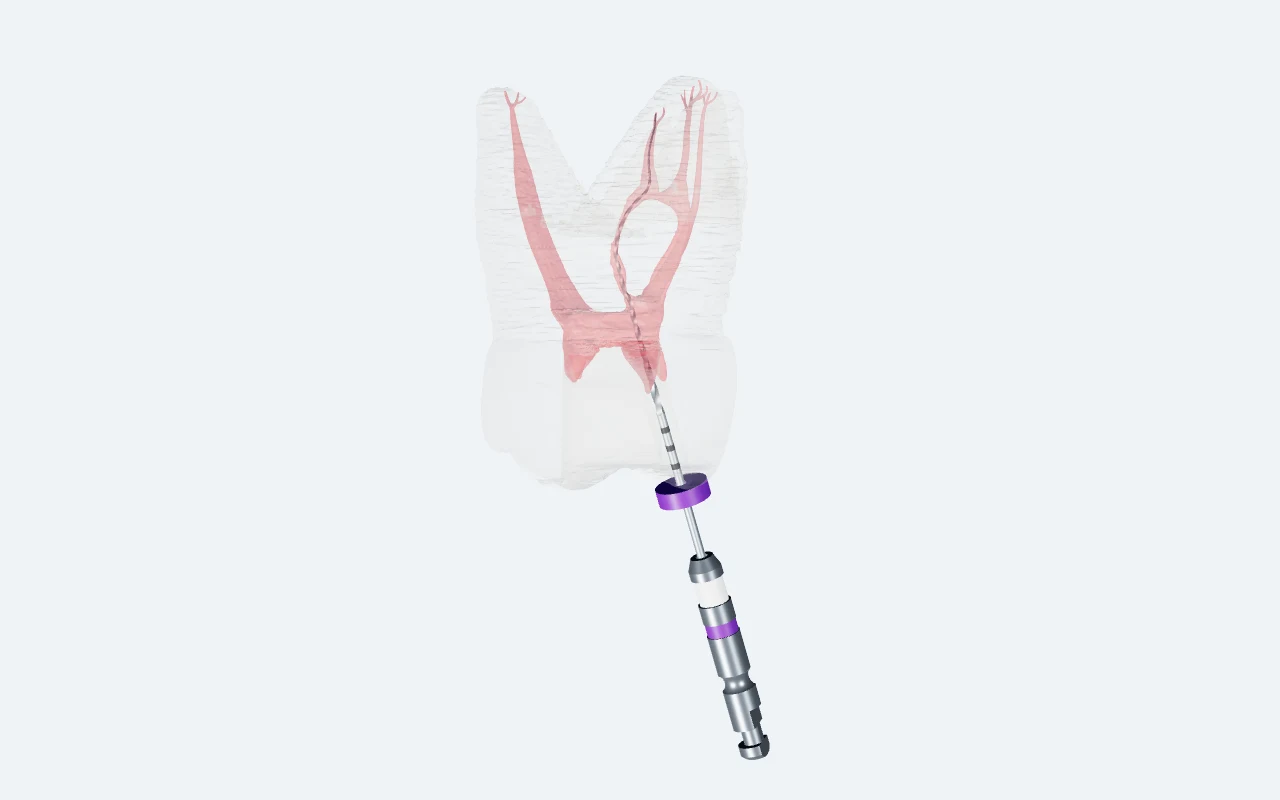
Rotate · zoom · isolate canals · inspect apical branches
MB2 glide path: the thicker rotating file follows the approved route to its apical endpoint, with the single 21 mm CAD stopper seated at the top cusp reference. Non-to-scale educational animation; wall contact/overlap is permitted, not simulated as cutting or a clinical file-fit measurement.
Watch video insteadRead the chamber floor, remove coronal interference, and confirm a reproducible path before shaping.
Chairside sequence
Step by step
- 01
Expose the landmarks
Identify MB1, DB, and the palatal canal. Preserve the chamber-floor map and remove the mesial dentine shelf in controlled increments.
- 02
Localize the orifice
Inspect the developmental groove palatal to MB1 with magnification and illumination. The source guide describes a common search area 1.5–2.0 mm palatal to MB1; anatomy varies.
- 03
Scout the direction
Use a small precurved hand file to confirm the pathway. Irrigate, withdraw, clean, and reassess when progress stops.
- 04
Confirm the glide path
A file should leave and re-enter the established path without force. A mechanical glide-path instrument follows that confirmed direction.
If the file binds, stop and reassess the access and direction.
The dentine shelf can hide the entrance
A mesial overhang between MB1 and the isthmus can obstruct both visibility and the initial file angle. Refine it with controlled instrumentation, irrigating and inspecting frequently. Avoid blind troughing toward an assumed location.
Know how MB2 connects
MB2 can merge with MB1, remain separate, or communicate through an isthmus. Confirm working length and pathway behavior before deciding how much to shape. Angled radiographs and CBCT, when indicated, can help resolve anatomy that is unclear clinically.
Anatomy evidence
In a 2020 CBCT study of 522 maxillary first molars in an Emirati population, Al Mheiri and colleagues identified MB2 in 80.1% of teeth. The reported mesiobuccal configurations were Type II (59%), Type I (19.9%), Type IV (15.3%), and Type III (5.7%). These findings describe that study population.
Keep the details to hand
15 points. The full checklist.
Expand the practical notes and follow the linked teaching videos, or download the original NZ checklist.
Sources & further reading
Read the source material
- Al Mheiri et al. — maxillary first-molar anatomy, 2020 ↗
- Original EndoTech NZ guide and resource links ↗
- Full checklist bibliography →
Adapted for the EndoTech USA education library. NZ reference documents retain their original edition and branding.
Continue reading
All guides →Access & anatomy
Follow the curve: shaping curved canals
Establish the path, read the feedback, and preserve the canal’s original course.
Disinfection
Irrigation that reaches beyond the file
Fresh chemistry, controlled delivery, and enough contact time to work in the anatomy instruments cannot reach.
Access & anatomy
Control in the apical third
Establish the endpoint and account for curvature, narrowing, and ramifications near the canal terminus.